Archive for the Raising Copper Category

More hammered jewelry

Posted in Forging, jewelry, jewelry making, metalwork, Raising Copper on August 16, 2010 by Jim

Making jewelry is more fun than I want to admit

I am still fooling around with making small jewelry pieces. This really is more fun that I am letting on and less messy than making a coal fire in the forge.

A tale of two rings

I made the silver and copper ring in this photo by punching out a half inch hole in the center of a quarter. I rolled it into a ring on a mandrel. This style is called a ‘washer ring’. There is a great video about doing this with Mokume Gane (silver and copper layered like damascus steel) on youtube here. The second, and larger,  ring in this photo is formed from hammered copper wire. I soldered it with silver solder and it has a visible solder line. It also turns your finger a pretty shade of green…

Copper and nickel rings

If any of the folklore about copper is true, I will never have any arthritis pain.

I also made another set of earrings. This time I branched out and added some red stones to the center of the flowers. I am getting plenty of flack from the guys for all this by the way. I guess I will just have to buck up and take it.

Hammered copper earrings with flowers and red stones

I put the earrings up for sale on my newer Etsy site here.

Alright, enough reading, get up and go make some stuff!

Have a great week,

Jim

Hammered Copper Earrings with copper flowers

Posted in Forging, jewelry, metalwork, Raising Copper on August 4, 2010 by Jim

Tiny hands would be very helpful if you were a jeweler!

My hands were not made for this tiny stuff but I was coerced.

A friend saw my hammered copper fishing lure from the post just before this one. She asked me to make her a pair of copper earrings. She has a look that says ‘You damned well better do this,’ and ‘pretty pretty please’ at the same time…

All that is left to do is drill the holes for the part that goes through your ear.

Roycroft style hammered copper earrings with hammered copper flowers

If there are any jewelers looking at this – give me a break. I am more of a ham-fist, better suited for blacksmithing and making fishing lures than jewelry. I am impressed with all you folks that can make tiny things.

Happy Making,

Jim

Hammered Copper and Stainless Steel Fishing Lure

Posted in Fishing Lures, Forging, jewelry, metalwork, Raising Copper, Tool Making on August 2, 2010 by Jim

Is there such a thing as a Roycroft fishing lure?

I have been making lures like this one for a long time:

Hand carved Spinner Popper Frog fishing lure

It is really enjoyable making these. I can make cooler looking lures than I can buy and I can modify them to suit the places where I fish. My lures work great – they catch a ton of fish. It’s also a kick to open my tackle box around the guys knowing that they don’t have any of the lures that I have.

One thing that has always been annoying to me about lure-making is having to buy the metal hardware.

I usually hate buying something that I can make. Today I realized I could make make the metal parts of my lures. I could even make entire metal lures. I learned what I needed in the metalworking class I just took at the Lawrence Art Center. I guess I can be kind of slow on the uptake some days…

Anyway, here it is, for your perusing pleasure, the first ever, one of a kind, Roycroft style hammered copper fishing lure (click the image to see it larger):

Roycroft style hammered copper spoon lure

This spoon lure looks fantastic in the water. It darts and flashes like a drunk little bait fish on an underwater jet ski! I took it out in a sunny area where the water was murky and got a bite on the second cast. This is a great working lure.

I started all this, like I often do, in my buddy Dave’s steel scrap pile. He pulled out a railroad spike and I ground and polished it into a spoon shaped sheet metal forming stake:

Custom Handmade fishing lure

The copper was supple and simple to form and hammer mark. I cannot say the same about the stainless steel. I have not worked stainless before like this and it was not friendly. I will have to do some research on annealing stainless before I make the next lure. I riveted it all together with brass pins cut from 18ga wire.

All in all, this was a really happy afternoon’s work and it gave me an excuse to go fishing (you know, purely research purposes, so forth, etc…).

If you have any questions, or for goodness sakes, if you have advice about how to anneal stainless, I am all ears.

Happy Making,

Jim

Be forewarned, I am not a master Japanese blacksmith

Posted in Blacksmithing, Forging, Hammers, metalwork, Raising Copper, Tool Making on July 19, 2010 by Jim

If you have not seen a Japanese hammer (genno or shinzan) made my a master blacksmith, then you are missing out on one of the most beautiful tools ever made. I am particularly taken with a style called a ‘Shinzan’ hammer. Take a look at one here.

I have long wanted one  but cannot afford a hundred dollar hammer, regardless of how beautiful they are. So it was off to the forge for me.

My hammer…

I am obviously still on the hammer making kick and I was able to get two things I wanted at once. I needed a raising hammer for the copper work I am doing and I wanted a hammer head that looked like the Shinzan hammer I had seen.

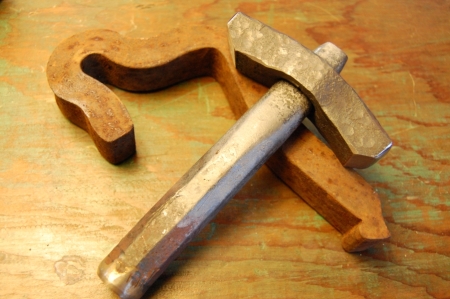
Hand forged hammer head

This picture has three interesting things in it. There is the piece of rusted metal exactly like the one I dug out of a scrap pile to make my head. There is the drift that I made to punch and shape the handle hole. And lastly, the head itself.  I am really happy with how this all turned out. The silver look of the drift is due to the anti-seize compound I put on the drift before I drove it through. The grease burned off and it plated the drift with this silver metal. I learned this trick from a very kind local blacksmith. It kept the drift from sticking in the head when I drove it through.

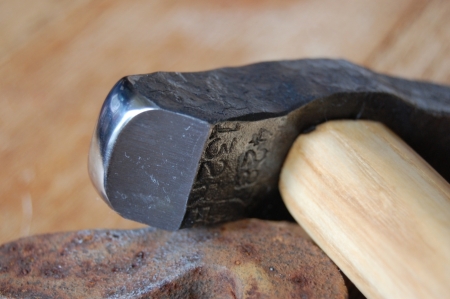
The stock that I started the head from had some numbers stamped into it and I thought they were pretty cool. I was able to save them on the bottom of the head.

This is obviously not a Shinzan shaped hammer as it has an arching body, but I like how the one I had seen used hammer blows for a decorative effect. That was part of what I was going for.

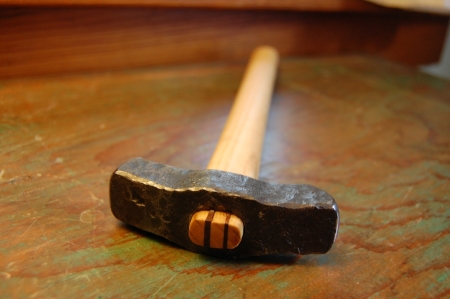
I used two different sized wedges to hold the head in. the hammer has a 1/4″ face and a 3/8″ face. I put the smaller wedge on the smaller face side so I could tell which way the hammer was turned while I was raising.

I made the handle longish and straight to make it look even more like a Japanese style hammer.

I was not sure at first if I would like a straight handle and I initially carved the handle in a western style. It just didn’t look right so I grabbed the spoke shave and ended with this. It feels great in my hand. I raised one course on a 6″ copper bowl tonight and this is a fantastic hammer.

None of this would have been possible without the use of my friend Dave’s forge. Thanks Dave!

Happy making,

Jim

Blacksmithing hammer solves copper raising problem

Posted in Blacksmithing, Hammers, metalwork, Raising Copper on July 12, 2010 by Jim

This is a thank you post. I was given the most beautiful hammer as a gift today. (Yep, I said ‘beautiful hammer’, I say stuff like that) Thank you Dave. And thank you Brad for giving the hammer to Dave!

I was explaining how I was raising this copper vessel and couldn’t get the ‘umpfh!’ onto it to turn it back onto itself  and get the egg shape I wanted. I whined about not having just the right raising hammer. My good friend and blacksmithing mentor wanders off for a second and comes back with this Peddinghaus hammer and gives it to me! I could hardly believe it. I have always wanted a Peddinghaus hammer. As far as hammers go, this is some sexy stuff…

I rounded the sharp edges, polished it up, and voila, I got my egg shape!

Blacksmithing Hammer used to raise copper vessel

Raising Hammers and Stake

Posted in Blacksmithing, Forging, Hammers, metalwork, Raising Copper, Tool Making on July 9, 2010 by Jim

If you haven’t seen David Huang’s website and work, then click here.

He has me all inspired and I finished a new tiny steel raising hammer and went to town on another poor circle of copper.

Raising hammers, stake, and hand hammered copper bowl

Happy Thursday night, happy making,

Jim

Making a leather sandbag for metal forming

Posted in Blacksmithing, Forging, Leather working, metalwork, Raising Copper, Tool Making with tags , , on July 5, 2010 by Jim

First, a little leather work – making a sandbag

I wanted a 12″ sandbag, but was not willing to spend the $50 or $60 to buy one. I had some good scrap leather in the shop and made my own.

I started by taking 6″ into my dividers.

Taking six inches into a divider

I drew two twelve inch circles on the back of my leather.

Drawing a circle on leather with dividers

And cut them out with some kitchen shears. I find that good kitchen shears do a great job cutting leather.

Cutting circles in leather

I ran a line of Barge Cement around each piece, skipping 1″ to allow for filling. I let the cement dry and stuck the two pieces of leather together. Next, I punched holes  around the edge with an awl. I used a saddle stitch and some strong waxed twine to sew the edges. All that was left was adding about  six cups of sand.

Filling leather sandbag

After pouring in the sand, I glued and stitched the last bit shut. Here is the bag with a sheet metal forming stake that I have been working up in the forge. It started from a circus tent stake. One end is mostly done and the rough end will be a ball shape when I am done.

Sandbag and sheet metal forming stake

I had looked for some forming stakes to buy and was astounded at how much a simple T stake could cost. I found several that were three hundred dollars or more. Per normal, I went to the forge and shop and made one.

Happy Fourth of July and happy making,

Jim

UHMW Plastic Hammer Head

Posted in metalwork, Raising Copper, Tool Making on July 2, 2010 by Jim

Hammers! Hammers! Hammers!

I cannot stop making hammers. This is a hammer head made of UHMW plastic. That is ‘Ultra High Molecular Weight’ plastic. It is incredibly abrasion resistant, and pretty cool to boot… The handle is cherry. It should be a good non-marring hammer for me to use in raising this copper vessel.

UHMW Plastic Hammer

Making a hammer is  the most primal amazing feat of tool making. Hammers are a magical thing. Once you have a hammer, you can make all the other tools. In the past, blacksmiths would break off a piece of their hammer and forge it into their sons first hammer when he began his apprenticeship. As for me, a tiny brass hammer that my grandfather made is one of my prize possessions – a rosebud if you will.

I made this hammer as a copy of one that my metals instructor, Bryan Park, had made.

Happy Making,

Jim

Raising Copper!

Posted in metalwork, Raising Copper on July 1, 2010 by Jim

I am taking a metalsmithing class at the Lawrence Art Center and it is a real eye opener for me! I should have done this years ago.

We have a great teacher, Bryan Park, a great facility, and all the students seem really glad to be there.

Raising A Copper Bowl

This week, I started raising my first  vessel from a flat sheet of copper. Here it is after two preliminary rounds of sinking (beating the copper into a depression to start the right shape).

Hand raised copper bowl