Archive for the Tool Making Category

Custom Hunting Knife

Posted in Blacksmithing, bladesmithing, Forging, knifemaking, metalwork, Tool Making with tags , , , , , on July 20, 2018 by Jim

A little hunter I just finished up with some progress pics. It is 1084 steel with a stabilized box elder burl handle and a brass guard.

handmade forged hunting knife

forged knife blade

Just off the anvil.

Forged and profiled hunting knife blade

Forging done and profiled.

Hunting knife blade flat ricasso

Ricasso flattened in preparation for laying out for grinding and for fitting the guard.

Knife guard fitting jig

Starting to fit the brass guard with a guard press.

Brass hunting knife guard

The guard slotted and rough shaped.

Fitting handle wood onto blade

Laying out the blade on the handle material.

Thanks for looking – happy making,

Jim

Instagram hammer-in August 26th!

Posted in Blacksmithing, bladesmithing, Forging, knifemaking, metalwork, Tool Making with tags , , , , on August 23, 2017 by Jim


instagramFourHammerIn

Saturday August 26th, 2017 (1pm CDT) – four of us are going to do an Instagram hammer-in (#instagramhammerin) for you all to watch. We will each forge a knife of our own design, starting with the same sized stock, forge for two hours, and show a picture of the blade every 10 minutes or so.

There will be four smiths working   ABS Mastersmith Lin Rhea, Forged in Fire contestant Robert Burns (Wilderness Ironworks)  , blacksmith instructor Matt Jenikns (Cloverdale Forge), and me.

This is not a contest. No prizes will be awarded – it’s just for fun and hopefully the pictures will be an educational resource for new bladesmiths.

We hope you follow along, ask questions, and enjoy these great smiths (and me) showing us their forging step by step. Follow along by watching the hashtag #instagramhammerin


Forging a bottle opener from a bolt

Posted in Blacksmithing, bottle opener, EDC, Forging, Gear Making, metalwork, Tool Making with tags , , , , , , , on June 10, 2017 by Jim

I posted a video on YouTube showing how I forge one of my large bolt bottle openers.

BoltBottleOpenerCollage

Thanks for stopping by,

Jim

Drop Point Hunter Knife Pattern

Posted in knifemaking, Tool Making, Woodworking on December 2, 2015 by Jim

No tutorial today, but process pics.

I am working on a drop point hunting knife and was not sure from my sketches if it was going to feel how I wanted. I needed to hold it.

WoodenDropPointHunterParts

I ground the blade just as if it was steel – but it is cherry. I also roughed in the guard and handle in walnut.

DropPointHunterFinished

Here it is with the ‘blade’ glued in and the handle shaped.

It might seem silly to rough it out all in wood – but holding it in my hand told me what I needed to know. If all goes well, I will post pics of the real knife soon. This one is a drag to keep sharp…

Happy Making,

Jim

Making a stainless steel pocket pencil

Posted in metalwork, Pencils, Tool Making with tags , , on June 2, 2014 by Jim

I love advertising pencils

Antique advertising pocket pencils

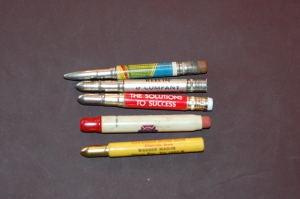
The ones that say ‘Dot’s Diner 123 main,’ etc… If I see them in a box at an auction or rummage sale, they are coming home with me. My problem with them is that the erasers are rock hard and sometimes the pencil tube is cracked or broken somehow. Usually, they are simply constructed – a tube with an eraser in one end and a steel cap that holds a pencil to put in the other. The pointy cap bit is difficult to make, so we won’t do that.

But first – you can rehab an existing pocket pencil

If you don’t want to go through all the hassle of making you from scratch, you can fix up an old one that is in decent shape. On the vintage pencils I have, the erasers are mostly the same size as newer children’s pencil erasers.

TryRexGoodLight

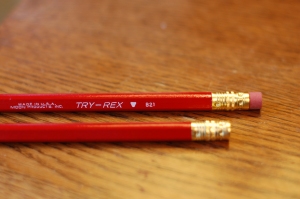
I found a bin full of these Musgrave TRY-REX pencils at a local office supply and I just yank the eraser from the Musgrave and replace the rock hard one in my pocket pencil. I also shine up the caps on my pocket pencils with SimiChrome polish on a soft rag – only a tiny bit of polish is needed. It is foul smelling stuff but does a great job.

If you are feeling more adventurous, you can make a new pocket pencil (with a little stealing…)

You will need an existing vintage pencil for this. Find the nastiest cheap one that still has a good chrome cap on it. That is the only part we need. Take the chrome bullet end off and head to the hardware store. Looking at my local hardware store yielded this  3/8″ x .028″  stainless steel tubing.

3/8

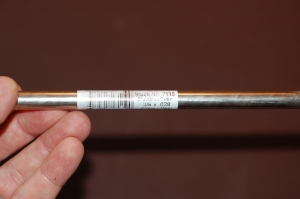
Use the chrome end off of your old pencil and try to gently press fit it into tubing at the store until you find a piece that is just a hair too tight. If it is too loose, it will not work.

Dremel sandpaper holding jig

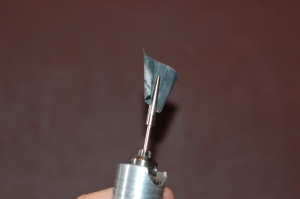
I use this slotted mandrel from Rio Grande that lets me put my own sandpaper bits in my Dremel or flex-shaft. I needed to remove quite a bit so I started with 80 grit, and I worked my way down to 400 grit, constantly testing with the cap from the old pencil, until it just goes in easy enough. Sand a little, test fit, sand a little more, test fit… For the eraser on this one, I found some Retro 51 Big Shot eraser replacements that fit with just a little polishing inside the stainless tube. The Musgrave ones would work, but I liked the look of the white eraser with the stainless tubing. Cut the last few inches off of your Palomino Blackwing pencil (or steal a golf pencil from the library like I did), put it in the chrome cap, and there you have a life-timer of a pocket pencil!

Handmade Stainless Pocket Pencil Extender

(Click the picture for a larger view) Happy Making, Jim

Loveless Style Hunting Knife in O1

Posted in Blacksmithing, EDC, Forging, knifemaking, Leather working, metalwork, Tool Making with tags , , , , , , , on January 7, 2014 by Jim

I started this knife quite a while ago. It has been sitting on my bench for over a year – until now.

Handmade Loveless Drop Point Hunter in o1 steel

I made it to be part of a hunting set and showed the smaller first knife here quite a while ago.

Here are the two knives finally together.

lovelessCopySet

I carry the smaller knife as a fixed blade edc pocket knife.

They are both 01 steel with green micarta handles and red liners. The blade on the larger one is about 3″.

I also made the sheath and to be honest – I almost enjoyed that as much as making the knife.

Happy Making and new year to you,

Jim


Integral Knife forged from 52100

Posted in Blacksmithing, Forging, knifemaking, metalwork, Tool Making with tags , , , , on November 4, 2013 by Jim

I recently got a beautiful integral fixed blade knife from Master Smith Ray Kirk. I like it so much that I had to try and make one for myself. I bought a couple 3/8″ round bars of the 52100 from Ray and here is what I came up with:

Hand Forged Knife

Thanks to my friend Dave from Circle H forge for the beautiful piece of stag.

Lots of folks have been helping me with all this. Ray spent an hour walking me through how to make a blade like this.

Also, Master Smith Lin Rhea is always there with an answer to anything I need help with.

I have come to find that the folks in the American Bladesmith Society are just some of the best people out there.

-Happy Making,

Jim

Making a knifemaking file guide for for two dollars

Posted in Gear Making, knifemaking, metalwork, Tool Making with tags , , on July 29, 2011 by Jim

For my current dagger project, I am worried about getting the plunge lines straight and equal; that and the edges of the ricasso where they meet the guard. I have known about file guides for a while but have a hard time spending fifty dollars to get one. Or even $150 to get the really nice carbide faced one from Uncle Al’s.

Here is one I made last night in the shop.

Knife filing jig made from 0-1 steel

The most expensive parts on this jig were the bolts. Two of them for $0.98. The rest is scrap from around the shop. I spent a couple hours getting it together.

The jaws are O-1. The guide rods were scrap 3/8″ rod stock. I drilled four holes and tapped two opposing holes in each piece.  I checked that everything was ground flat, square, and parallel as I could get by hand. I don’t have a mill. I hardened with straight soybean oil from the grocery store.  I just barely tempered the O-1 (350 for an hour). I wanted to leave the face hard so files will not wear thorough them.

These are not as pretty as store bought but I think they will work just fine.

O-1 hardened knife filing jjg

Reworking a Swiss Army Knife – EDC folder rework

Posted in Blathering, knifemaking, metalwork, Tool Making with tags , , , on June 6, 2011 by Jim

I love the blade on the Victorinox florist knife. It has a great shape for what I need in my EDC. I do wish though, that it was a little more sturdily constructed.

This weekend, I set out to remedy this issue.

Here is my trusty apple slicer:

Victorinox florist Knife

You can see that it is well loved! Well, I loved it so much that I felt the need to grind the pins out and take it apart 😛

This knife is really well thought out and well made but I wanted it to be a bit heavier. Also, I am really surprised that they do not put a half stop in the blade. A half stop makes the blade pause at 90 degrees when you are closing it. A nice thing if your fingers might be in the way!

Here are the new brass liners (to replace the light aluminum ones that came on the knife), red liner material, and micarta scale blanks I planned to put on this lovely knife. I also ground a flat on the end of a blade to make that half stop I was wishing Victorinox would have done for me.

MicartaScalesAndBrassLinersForVictorinoxFloristKnife

A little time passes (internet magic and epoxy…) and here is the spine:

Spine of Swiss army knife rescaled with Green Micarta and red liners

And here it is, sitting so safely at that hoped for half stop:

Green micarta Swiss army knife rescale

My knife now has the heft and safety features I was hoping for. My lunch apples are very nervous!

Happy Making,

Jim

Making a chain mail shirt for a child

Posted in Chain Mail, Gear Making, jewelry making, metalwork, Tool Making on October 30, 2010 by Jim

I casually said to someone that I would make their child a chain mail shirt. I even said that I thought it would be fun. It was fun but turned out to be a bit more work than I expected. Approximately thirty hours of work later, many sore fingers, and about two dozen #1 jewelers saw blades , I had a finished chain mail shirt. This shirt is 18″ tall and 13″ wide. It will fit on a three year old.

I learned some helpful tricks about making chain mail.

A simple jig makes uniform rings easy:

For this jig, I drilled a small hole through a 3/8″ mild steel rod from the hardware store. You can see the aluminum electric fence wire I used going through the small hole. To make the rings, I chucked an electric drill to the rod and turned it slowly in the wooden form you see it sitting in . I found quickly that a leather glove helped my fingers survive.

A jump ring cutting jig

The rings used in making chain mail can be called jump rings. I saw a jig like this at a jewelers bench. They were using it to cut ring bands. Clamped in a vise, it works great for cutting the rings apart like this:

If I were going to make another shirt, I would probably cut the rings apart with snips instead of sawing them. I thought of changing mid-stream on this shirt but the rings looked different from the ones I had already woven together.

When I was working on this, I found a great trick online but cannot find the tutorial again. It makes everything go twice as fast. Briefly, you make chains of rings, two into one, as long as you want the finished section to be. Make many of these, then join them. I see that most tutorials show people adding one ring at a time into a mesh of fabric and that was horrible for me. Making the long chains and joining them made me twice as fast and far less frustrated.

If that doesn’t make sense, email me – jim (at) makestuffwithyourhands.com and I will try and explain or post an example.

Happy making,

Jim